Sunday, September 19, 2010

Designing a test tile

I’ve been printing some initial tests and will have images up soon.

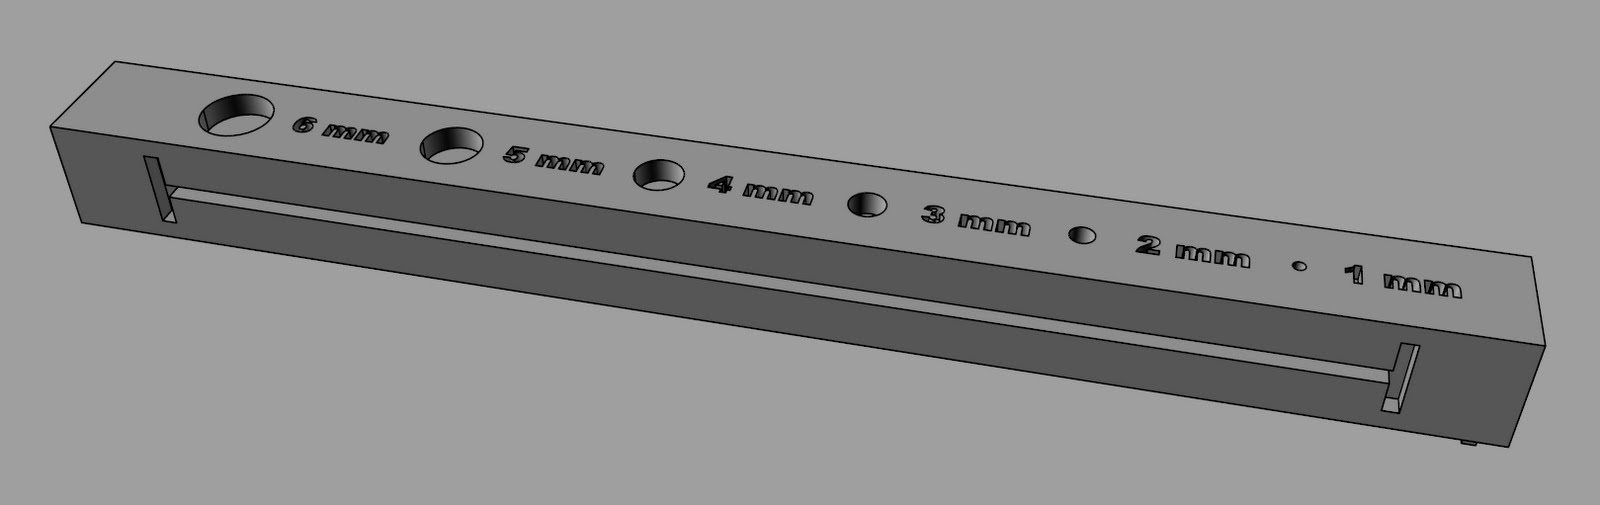
In the meantime, I have designed a test tile using Rhino 3D. 3D printing is fairly new to me. As I get more experience, I’ll get a better idea of what is useful information and what is not. As of now, I’m testing for a few different aspects: namely linear shrinkage and resolution. Resolution will be affected by layer thickness and also by how much bleeding occurs during the printing process. For this second aspect, I have included both intrusions and protrusions from the main bar. With results that bleed too much, material within the holes will probably not depowder easily. Resolution of the protrusions will probably be a bit more forgiving in this respect. That’s what I’m thinking anyway. Well see how this translates in real life.


Side 1 - Intrusions and protrusions. The nominal values refer to the width of each feature. For the height / depth, I'm using three times half the width (i.e. the protrusion on the far right is 0.04" wide and 0.06" tall; the intrusions is 0.04" wide and 0.06" deep).


Side 2 - Id. No test is meaningful without it!


Side 3 - Intrusion test. A variation on side #1. The smaller dimensions on side #1 may be a bit too optimistic. These dimensions are more generous.


Side 4 - Shrinkage line. I'm using 100 mm, as this is common in ceramic shrinkage bar tests. 1 mm translates readily into 1%, making measurements straightforward.


Perspective showing overall dimensions - That's 0.39 x 4.57 inches. Also note the intrusion on the end. The sharp inside corners should be quite telling for depowdering/bleeding purposes.


Screen shot of the template file.


The Rhino file for this is found here…3DM file

I also have the STL output from this file here…STL file


Wednesday, September 8, 2010

Spray drying refinement

I haven’t forgotten about this blog. It’s actually been on my mind for some time. I’ve just been really busy. School has started and I’m overwhelmed at the moment. I’m looking forward to the near future when things settle down a bit and I can get back to focusing on this research.


I’ve been working on several fronts. With regards to testing powder behavior, I’ve built a system for measuring friction within the powder. This should allow me to predict how materials will behave in small batches before committing to larger amounts for the machine. I’ve also started using a new dry mixing system (it’s actually resurrected from the engineering department’s grave). I’ll document both of these as time permits. Finally, I’m still actively searching for a better way to screen material.

In the meantime, I did get some promising results. I re-ran some batches of ceramic powder through our spray drier equipment. In my original attempt, only 22.3% of the material I started off with in slip form ended up being usable after spray drying (where usable = passing through a 200 mesh screen). The vast majority was simply too large.

For this second batch, Hyojin suggested dropping the PEG down to 0.5% He also suggested making a volume suspension of 20%.

This worked out to be 52g dry / 80g water.

In batch terms…


This second batch sprayed much finer and the yield improved dramatically (isn’t it wonderful when theory translates into reality?). Decreasing the PEG and increasing the water increased the amount of material below 200 mesh from 22.3% up to 38.1%. There's probably a trade off somewhere I'm not aware of yet. For now I'm just glad things are working out. I'll be mixing this with binders in the next few days and will post the results soon!